JWT 全称 JSON Web Tokens ,是一个非常轻巧的规范。这个规范允许我们使用 JWT 在用户和服务器之间传递安全可靠的信息。它的两大使用场景是:认证和数据交换。
第一步、下载composer
# 建议使用1.0以上版本

composer require tymon/jwt-auth 1.*@rc
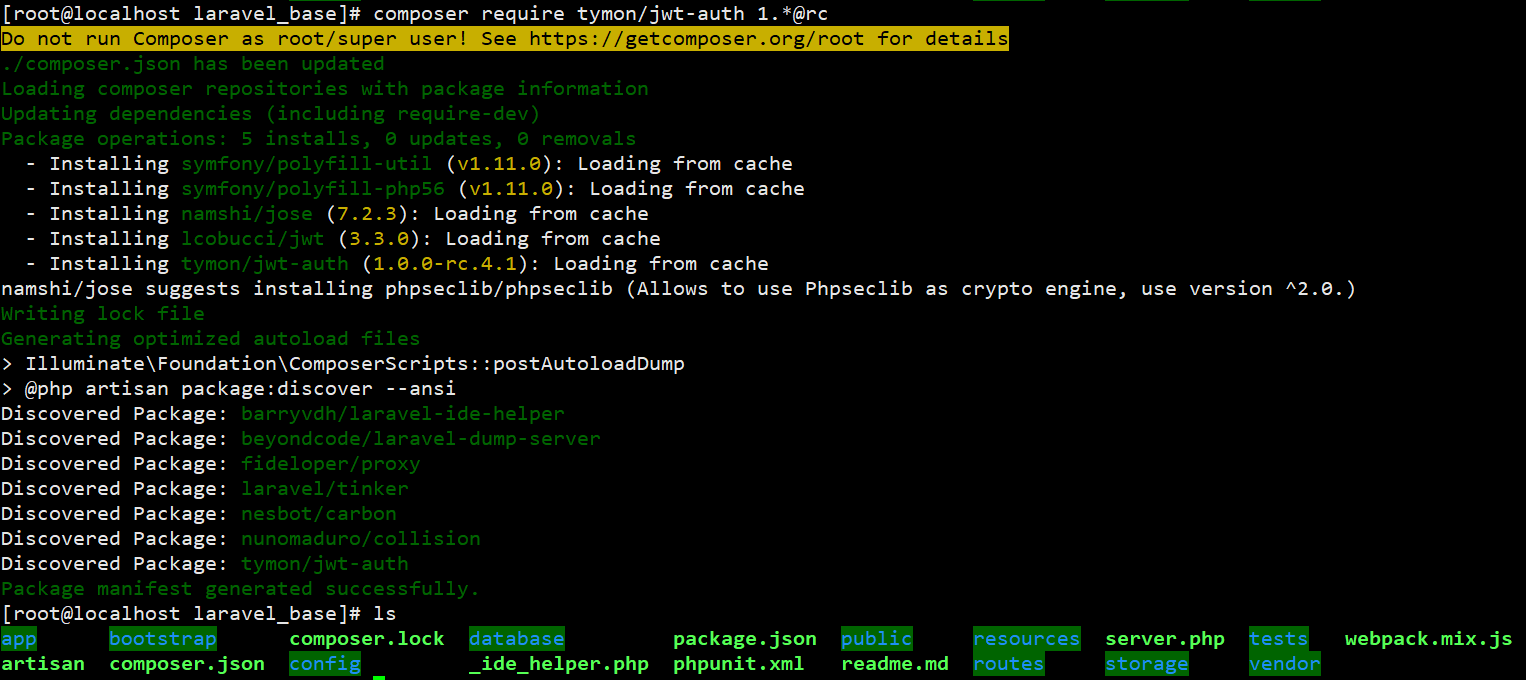
第二步、生成文件、修改配置
php artisan vendor:publish --provider="Tymon\JWTAuth\Providers\LaravelServiceProvider

php artisan jwt:secret

[root@localhost laravel_base]# php artisan vendor:publish --provider="Tymon\JWTAuth\Providers\LaravelServiceProvider"
Copied File [/vendor/tymon/jwt-auth/config/config.php] To [/config/jwt.php]
Publishing complete.
[root@localhost laravel_base]# php artisan jwt:secret
jwt-auth secret [Jyxc5QkfSSEHNv7XC6wW4YDw0HvBAoApPYfGhnyv5bhylmhyGSw8U44r1FKonviY] set successfully.
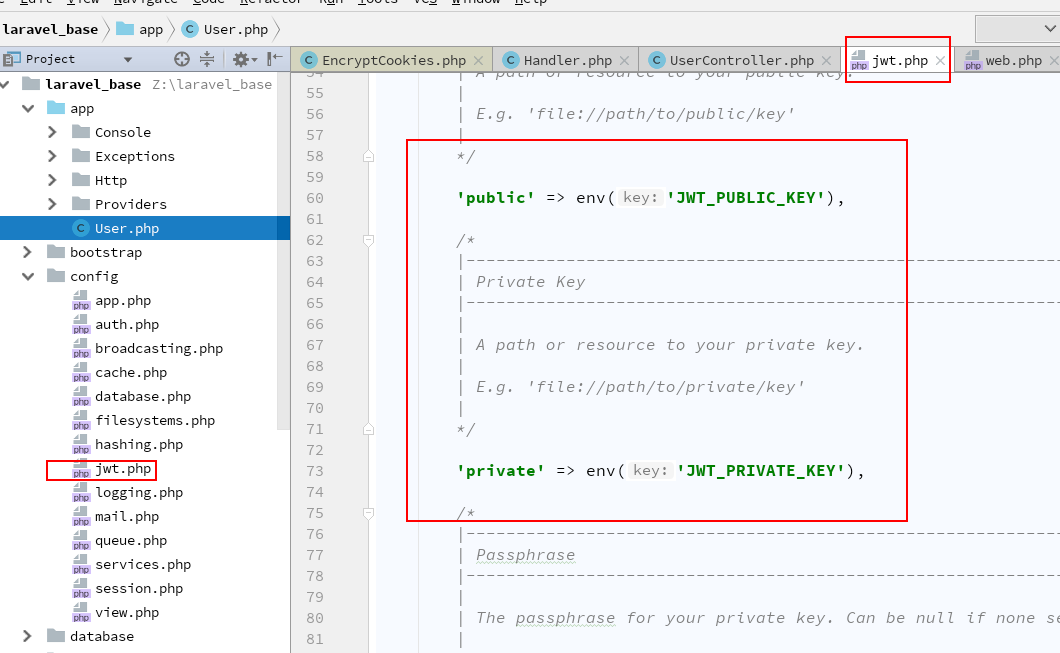
2.1 发布配置文件
# 这条命令会在 config 下增加一个 jwt.php 的配置文件
php artisan vendor:publish --provider="Tymon\JWTAuth\Providers\LaravelServiceProvider"
2.2 生成加密密钥
# 这条命令会在 .env 文件下生成一个加密密钥,如:JWT_SECRET=foobar
php artisan jwt:secret
[root@localhost laravel_base]# php artisan jwt:secret

 This will invalidate all existing tokens. Are you sure you want to override the secret key? (yes/no) [no]:
 > yes

jwt-auth secret [4Zule0z1Fy1BMPbW6MvCmFLhZV9ym9QaWlRqCft1BbMkvjLpmYWQ4akLi7hFSHE3] set successfully.
2.3 更新模型
如果你使用默认的 User 表来生成 token,你需要在该模型下增加一段代码
namespace App;
use Tymon\JWTAuth\Contracts\JWTSubject;
use Illuminate\Notifications\Notifiable;
use Illuminate\Foundation\Auth\User as Authenticatable;

class User extends Authenticatable implements JWTSubject    # 这里别忘了加
{
    use Notifiable;

    // Rest omitted for brevity

    /**
     * Get the identifier that will be stored in the subject claim of the JWT.
     *
     * @return mixed
     */
    public function getJWTIdentifier()
    {
        return $this->getKey();
    }

    /**
     * Return a key value array, containing any custom claims to be added to the JWT.
     *
     * @return array
     */
    public function getJWTCustomClaims()
    {
        return [];
    }}
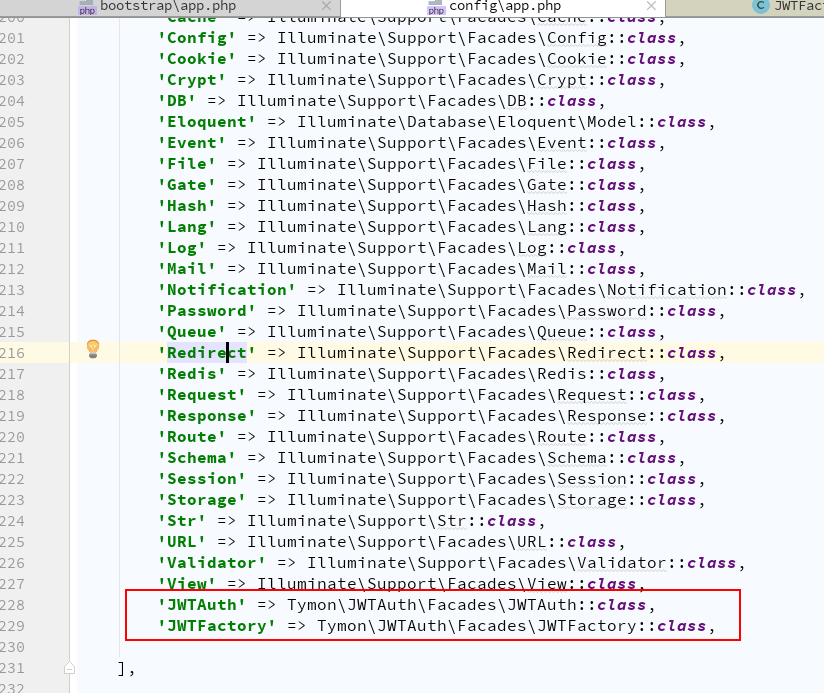
2.4 注册两个 Facade
这两个 Facade 并不是必须的,但是使用它们会给你的代码编写带来一点便利。
config/app.php
'aliases' => [
        ...
        // 添加以下两行

       'JWTAuth' => Tymon\JWTAuth\Facades\JWTAuth::class,
              'JWTFactory' => Tymon\JWTAuth\Facades\JWTFactory::class,
],
如果你不使用这两个 Facade,你可以使用辅助函数 auth ()
auth () 是一个辅助函数,返回一个 guard,暂时可以看成 Auth Facade。
// 如果你不用 Facade,你可以这么写
auth('api')->refresh();

// 用 JWTAuth Facade
JWTAuth::parseToken()->refresh();
如果你不使用这两个 Facade,你可以使用辅助函数 auth ()
auth () 是一个辅助函数,返回一个 guard,暂时可以看成 Auth Facade。
2.5 修改 auth.php
config/auth.php
'guards' => [
    'web' => [
        'driver' => 'session',
        'provider' => 'users',
    ],
    'api' => [
        'driver' => 'jwt',      // 原来是 token 改成jwt
        'provider' => 'users',
    ],
],


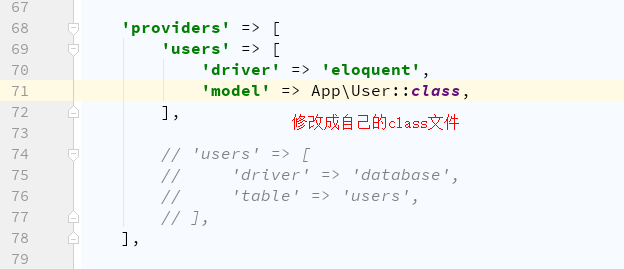
'providers' => [
    'users' => [
        'driver' => 'eloquent',
        'model' => App\User::class, //如果你的providers 不是这个User class类,那么需要指定到你的class 文件Z:\laravel_base\config\auth.php
    ],

    // 'users' => [
    //     'driver' => 'database',
    //     'table' => 'users',
    // ],
],
2.6 注册一些路由
注意:在 Laravel 下,route/api.php 中的路由默认都有前缀 api 。
Route::group([
    'prefix' => 'auth'
], function ($router) {
    Route::post('login', 'AuthController@login');
    Route::post('logout', 'AuthController@logout');
    Route::post('refresh', 'AuthController@refresh');
    Route::post('me', 'AuthController@me');
});
2.7 新建控制器类
<?php

namespace App\Http\Controllers;
use App\User;
use Illuminate\Support\Facades\Auth;
use Illuminate\Http\Request;
use Illuminate\Support\Facades\DB;
use Tymon\JWTAuth\JWT;
use Tymon\JWTAuth\JWTAuth;

class AuthController extends Controller {
  /**
   * Create a new AuthController instance.
   * 要求附带email和password(数据来源users表)
   *
   * @return void
   */
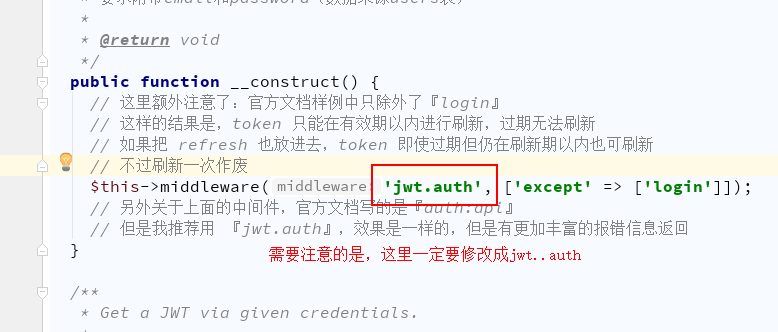
  public function __construct() {
    // 这里额外注意了:官方文档样例中只除外了『login』
    // 这样的结果是,token 只能在有效期以内进行刷新,过期无法刷新
    // 如果把 refresh 也放进去,token 即使过期但仍在刷新期以内也可刷新
    // 不过刷新一次作废
    $this->middleware('jwt.auth', ['except' => ['login']]);
    // 另外关于上面的中间件,官方文档写的是『auth:api』
    // 但是我推荐用 『jwt.auth』,效果是一样的,但是有更加丰富的报错信息返回
  }

  /**
   * Get a JWT via given credentials.
   *
   * @return \Illuminate\Http\JsonResponse
   */
  public function login() {


    //$data=User::active()->get();
    //
    //return $data;

    //
    //print_r(request()->input('access_token'));
    //
    //exit;

    $credentials = request(['email', 'password']);
    //$credentials = request(['name', 'password']);

    if (!$token = auth('api')->attempt($credentials)) {
      return response()->json(['error' => 'Unauthorized'], 401);
    }
    return $this->respondWithToken($token);
  }

  /**
   * Get the authenticated User.
   *
   * @return \Illuminate\Http\JsonResponse
   */
  public function me() {
    return response()->json(auth('api')->user());
  }

  /**
   * Log the user out (Invalidate the token).
   *
   * @return \Illuminate\Http\JsonResponse
   */
  public function logout() {
    auth('api')->logout();
    return response()->json(['message' => 'Successfully logged out']);
  }

  /**
   * Refresh a token.
   * 刷新token,如果开启黑名单,以前的token便会失效。
   * 值得注意的是用上面的getToken再获取一次Token并不算做刷新,两次获得的Token是并行的,即两个都可用。
   * @return \Illuminate\Http\JsonResponse
   */
  public function refresh() {
    return $this->respondWithToken(auth('api')->refresh());
  }

  /**
   * Get the token array structure.
   *
   * @param  string $token
   *
   * @return \Illuminate\Http\JsonResponse
   */
  protected function respondWithToken($token) {
    return response()->json([
      'access_token' => $token,
      'token_type' => 'bearer',
      'expires_in' => auth('api')->factory()->getTTL() * 60
    ]);
  }
}
这里面只有一个login是不验证的,其他方法都是验证token的,
另外注意一点,且必须包含一个password字段,这是不能丢弃的,否则jwt插件用不了
password
我们明文传递上来,保存在数据库中的字段是
\Hash::make('123456');加密的一个字符串
有了以上的配置几点,看一下运行结果:
看实际调用
login登录
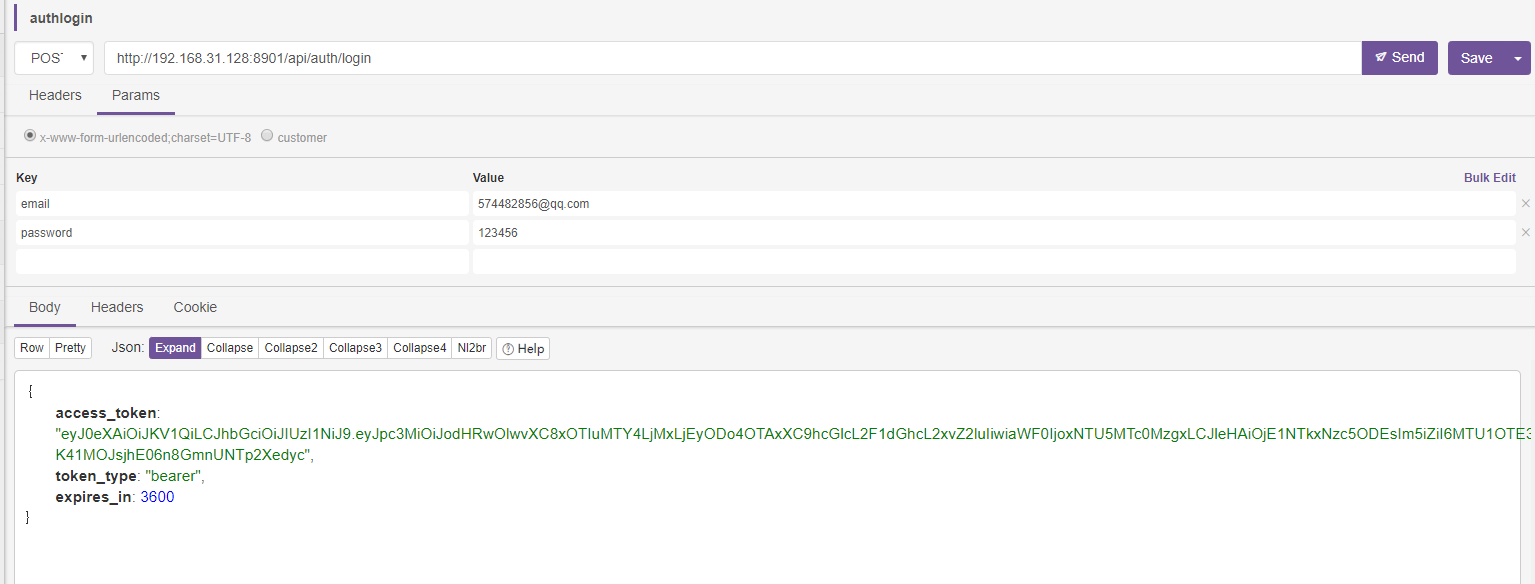
access_token 成功了
token的类型是 bearer
获取用户
auth/me
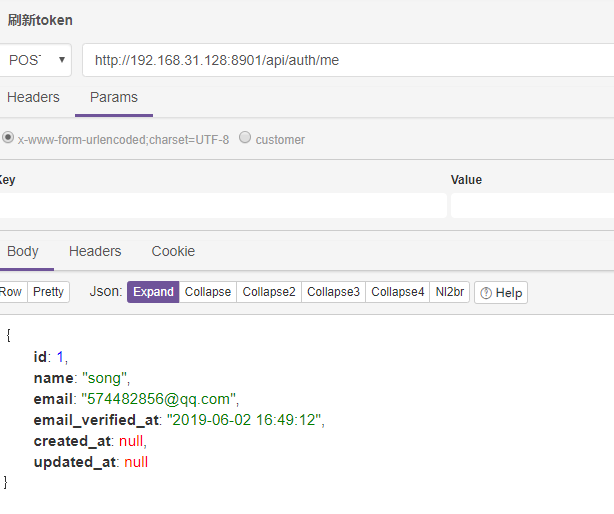
要访问auth/me必须传递token 串,传递方式 header 头的形式
Authorization 名字
bearer 这是类型,token字符串eyJ0eXAiOiJKV1QiLCJhbGciOiJIUzI1NiJ9.eyJpc3MiOiJodHRwOlwvXC8xOTIuMTY4LjMxLjEyODo4OTAxXC9hcGlcL2F1dGhcL2xvZ2luIiwiaWF0IjoxNTU5MTc0NDg1LCJleHAiOjE1NTkxNzgwODUsIm5iZiI6MTU1OTE3NDQ4NSwianRpIjoidU9KT3ZMaVBCWkRhYkk2dyIsInN1YiI6MSwicHJ2IjoiODdlMGFmMWVmOWZkMTU4MTJmZGVjOTcxNTNhMTRlMGIwNDc1NDZhYSJ9.ImxOqXPB6J8L-j8x0VqIuLnOcOxpjOJ1d4Tx_i2mAOg
如果字符串传递错误,就会返回
<title>Unauthorized</title>
<div class="flex-center position-ref full-height">
<div class="code">
401 </div>
<div class="message" style="padding: 10px;">
Unauthorized </div>
</div>
auth("api") 会返回
Tymon\JWTAuth\JWTGuard
这样的一个类,里面有具体的方式和方法
具体就到这里。
官方手册:
https://jwt-auth.readthedocs.io/en/develop/auth-guard/
其他知识普及:
token的创建 不止一种,接下来介绍token的三种创建方法:
1、基于账号和密码参数
2、基于user模型返回的实例
3、基于users模型中的用户主键id
1)基于账号和密码参数
// 使用辅助函数
$credentials = request(['email', 'password']);
$token = auth()->attempt($credentials)
// 使用 Facade
$credentials = $request->only('email', 'password');
$token = JWTAuth::attempt($credentials);
2)基于user模型返回的实例
// 使用辅助函数
$user = User::where('username','=','admin')->where('password','=','password123')->first();
$token = auth()->login($user);
// 使用 Facade
$user = User::first();
$token = JWTAuth::fromUser($user);
3)基于users模型中的用户主键id
2.3 token 的解析
a) 解析 token 到对象
只有 Facade 需要这样。
// 把请求发送过来的直接解析到对象
JWTAuth::parseToken();
b) 获取 token 中的 user 信息
// 辅助函数
$user = auth()->user();
// Facade
$user = JWTAuth::parseToken()->authenticate();
c) 获取 token
如果 token 被设置则会返回,否则会尝试使用方法从请求中解析 token ,如果token未被设置或不能解析最终返回false。
// 辅助函数
$token = auth()->getToken();
// Facade
$token = JWTAuth::parseToken()->getToken();
更多方法可以看文章后面的附录。
d) 如果是前端
直接 base64 解码 token 的前两段即可以知道所需的信息。
头部(header)
头部通常由两部分组成:令牌的类型(即JWT)和正在使用的散列算法(如HMAC SHA256 或 RSA.)。
例如:
{
  "alg": "HS256",
  "typ": "JWT"
}
然后用 Base64Url 编码得到头部,即 xxxxx。
载荷(Payload)
载荷中放置了 token 的一些基本信息,以帮助接受它的服务器来理解这个 token,载荷的属性也分三类:预定义(Registered)、公有(public)和私有(private),接下来主要介绍预定义的。
{
  "sub": "1",
  "iss": "http://localhost:8000/auth/login",
  "iat": 1451888119,
  "exp": 1454516119,
  "nbf": 1451888119,
  "jti": "37c107e4609ddbcc9c096ea5ee76c667"
}
这里面的前6个字段都是由JWT的标准所定义的,也就是预定义(Registered claims)的。
sub: 该JWT所面向的用户
iss: 该JWT的签发者
iat(issued at): 在什么时候签发的token
exp(expires): token什么时候过期
nbf(not before):token在此时间之前不能被接收处理
jti:JWT ID为web token提供唯一标识
将上面的 json 进行 Base64Url 编码得到载荷,,即 yyyyy。
签名(Signature)
签名时需要用到前面编码过的两个字符串,如果以 HMACSHA256 加密,就如下:
HMACSHA256(
    base64UrlEncode(header) + "." +
    base64UrlEncode(payload),
    secret
)
加密后再进行 base64url 编码最后得到的字符串就是 token 的第三部分 zzzzz。
组合便可以得到 token:xxxxx.yyyyy.zzzzz。
a) 载荷设置
载荷信息会在 token 解码时得到,同时越大的数组会生成越长的 token ,所以不建议放太多的数据。同时因为载荷是用 Base64Url 编码,所以相当于明文,因此绝对不能放密码等敏感信息。
$customClaims = ['foo' => 'bar', 'baz' => 'bob'];
// 辅助函数
$token = auth()->claims($customClaims)->attempt($credentials);
// Facade - 1
$token = JWTAuth::claims($customClaims)->attempt($credentials);
b) 载荷解析
从请求中把载荷解析出来。可以去看扩展源代码,里面还有很多的方法。
// 辅助函数
$exp = auth()->payload()->get('exp');
$json = auth()->payload()->toJson();
$array = auth()->payload()->jsonSerialize();
$sub = $array['sub'];
// Facade - 1
$payload = JWTAuth::parseToken()->getPayload();
$payload->get('sub'); // = 123
$payload['jti']; // = 'asfe4fq434asdf'
$payload('exp') // = 123456
$payload->toArray(); // = ['sub' => 123, 'exp' => 123456, 'jti' => 'asfe4fq434asdf'] etc
// Facade - 2
$exp = JWTAuth::parseToken()->getClaim('exp');
4. token 的三个时间
一个 token 一般来说有三个时间属性,其配置都在 config/jwt.php 内。
有效时间
有效时间指的的是你获得 token 后,在多少时间内可以凭这个 token 去获取内容,逾时无效。
// 单位:分钟
'ttl' => env('JWT_TTL', 60)
刷新时间
刷新时间指的是在这个时间内可以凭旧 token 换取一个新 token。例如 token 有效时间为 60 分钟,刷新时间为 20160 分钟,在 60 分钟内可以通过这个 token 获取新 token,但是超过 60 分钟是不可以的,然后你可以一直循环获取,直到总时间超过 20160 分钟,不能再获取。
// 单位:分钟
'refresh_ttl' => env('JWT_REFRESH_TTL', 20160)
宽限时间
宽限时间是为了解决并发请求的问题,假如宽限时间为 0s ,那么在新旧 token 交接的时候,并发请求就会出错,所以需要设定一个宽限时间,在宽限时间内,旧 token 仍然能够正常使用。
// 宽限时间需要开启黑名单(默认是开启的),黑名单保证过期token不可再用,最好打开
'blacklist_enabled' => env('JWT_BLACKLIST_ENABLED', true)
// 设定宽限时间,单位:秒
'blacklist_grace_period' => env('JWT_BLACKLIST_GRACE_PERIOD', 60)
JWT 完整使用详解
https://www.jianshu.com/p/7bb8fb395864
这是一个完整版的jwt非常详细 ,推荐查看:
https://www.jianshu.com/p/9e95a5f8ac4a
其他逻辑,https://learnku.com/articles/6216/laravel-uses-jwt-to-implement-api-auth-to-build-user-authorization-interfaces
https://laravelacademy.org/post/3640.html
参考文章:
https://learnku.com/articles/10885/full-use-of-jwt
https://www.jianshu.com/p/b89df38e886b
https://blog.csdn.net/qq_36514588/article/details/82186617
https://learnku.com/articles/10889/detailed-implementation-of-jwt-extensions